
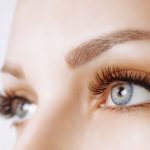
Do you want perfectly curled lashes every morning?
Eyelash lifts are all the rage in the beauty industry and for good reason. They can give you natural lashes a beautiful curl that lasts for weeks without all the fuss of extensions or daily mascara application.
The thing is….
Perfect results are not as difficult to achieve as most people may think. With the proper technique and a high-quality lash lift kit, anyone can get salon-quality lashes in the comfort of their own home.
If you are looking for everything you need to know to master the eyelash lift process from start to finish, then keep reading!
What You Will Learn
- What Sets Eyelash Lifts Apart From Extensions
- Preparing Lashes For The Lift
- Step-By-Step Application Process
- Common Mistakes To Avoid
- Tips For Making Results Last Longer
What Sets Eyelash Lifts Apart From Extensions
Lash lifts work completely differently than lash extensions.
Instead of applying artificial lashes, a lift is all about enhancing your natural lashes by curling them from the root. It gives the illusion of longer fuller lashes without any falsies.
In fact, there has been such a boom in lash extensions and lifts as the entire lash industry has been on the rise over the past few years. The lash extension market size is projected to reach $1.6 billion by 2024.
Lash lifts, in particular, offer a more natural look that many people prefer.
Think about it: extensions require maintenance every couple of weeks and can damage natural lashes over time. Lifts last 6-8 weeks and actually strengthen lashes with a keratin treatment.
The process is semi-permanent as it uses a chemical solution to break down and then reform the bonds within each lash. This gives lashes a permanent curl that looks completely natural. Pretty cool, huh?
Preparing Lashes For The Lift
Prepping the lashes for the lift is essential to get the best possible results.
Clean lashes are 100% key! If there is makeup, oil, or any type of residue on the lashes it will not allow the lifting solution to adhere properly. Use an oil-free cleanser and ensure all traces of mascara, eyeliner, and natural oils are removed.
Here’s what the prep process looks like in detail:
The eye area should be completely clean and dry. Pat the lashes with a lint-free cloth and ensure no moisture remains. Even a small amount of water on the lashes can dilute the lifting solution and ruin your lift.
The next step is to select the right shield for the lashes you are working on. Lash lift shields come in all different sizes to accommodate different lash lengths.
Shorter lashes require smaller shields and smaller sizes on the curling clamp. Longer lashes need larger shields to get the right curl.
The position of the shield is also critical. It should sit right at the lash line with the lashes combed upwards and attached to the shield. Spend time making sure everything is lined up just right as this step will determine the final curl.
Step-By-Step Application Process
Now it’s time to do the actual lifting! This is where the magic happens.
The first step of the actual lifting process is to apply the lifting solution to the lashes. This solution works to break down the bonds in the hair structure of each lash.
Leave it on for the recommended amount of time based on the thickness of the lashes. Fine lashes require less time while thicker lashes will need more processing.
Timing is critical here.
If you under-process, the lashes will not have enough curl. And if you over-process, it will damage the lashes.
Most lifting solutions have a processing time between 8-12 minutes but always refer to the specific product you are using for instructions.
After the lifting solution, comes the setting solution. This solution reforms the bonds in the new curled shape and sets the lift in place.
Apply the setting solution in the same way as the lifting solution and leave it on for the same amount of time.
The best part?
Most kits include a keratin treatment that nourishes and strengthens the lashes. It’s an optional step but highly recommended for shinier, healthier lashes.
Common Mistakes To Avoid
Of course, even seasoned professionals make mistakes occasionally, but being aware of what to look out for makes avoiding them easier.
The biggest mistake in the entire process is rushing through it. The time each step takes is important as is the care used to do everything properly.
Skipping the cleaning step or not drying the lashes completely before starting can lead to poor results that won’t last.
Another mistake many people make is using too much solution. A thin even layer works far better than drenching the lashes.
If there is too much solution, it will also seep onto the skin and cause irritation.
Here’s something most people don’t realize:
The placement of lashes on the shield will determine everything. If they are not combed directly upward, the lashes will curl in various directions.
The result is an uneven messy curl pattern instead of a clean uniform curl.
Temperature and humidity also impact results. Cold environments will slow down the chemical process while hot humid conditions speed it up.
Working in a comfortable room temperature environment is ideal for consistent results.
Aftercare is also important as getting lashes wet within 24 hours of the procedure can cause the curl to drop. Lashes need time to fully set before being exposed to water or steam.
Tips For Making Results Last Longer
With proper care, an eyelash lift can last up to 8 weeks.
The first 24 hours after a lift are the most critical. Avoid water, steam, and any oil-based products in this period.
This gives the lift time to fully set and ensures maximum longevity.
After the first day, conditioning the lashes will help maintain the curl. Use a lash serum or conditioning treatment to keep them healthy and strong.
Healthy, well-conditioned lashes will hold the curl better than damaged, dry lashes.
Something that’s pretty crazy to think about is how the lash industry has exploded in the last few years.
It was already a popular trend before the pandemic hit but since then, it has just taken off in ways that few expected. The DIY eyelash lifting market is growing at 7.3% annually as more people are mastering the techniques to do it themselves at home.
Sleeping position also matters. If you sleep on your face it can crush curled lashes and cause them to lose their shape.
Try sleeping on your back or use a silk pillowcase to reduce friction.
Regular touch-ups every 6-8 weeks will keep your lashes looking their best. As new natural lashes grow in, they won’t have the curl as the lifted ones.
Scheduling regular lifts will maintain that perfect curl throughout the year.
The Bottom Line
Perfect eyelash lift results come down to proper preparation, careful application, and good aftercare. The process is actually pretty straightforward when done in the right order and following the right steps.
The quality of the products used make a huge difference to both the results achieved and how long they last. It is so worth investing in a professional-grade lash lifting kit to get better, longer-lasting results.
The best thing is that once you master the technique, it is possible to achieve salon-quality lashes at home for a fraction of the cost.
No more expensive salon visits or daily mascara application routines.
Follow these steps:
- Clean and prep lashes thoroughly
- Select the right shield size for lashes
- Time the lifting and setting solutions accurately
- Avoid the common mistakes
- Follow proper aftercare
This process will give you gorgeous, curled lashes that last for weeks. It really is that simple!


Comments are closed.