
“Hair Photography Tips: How to Show Shine, Volume, and Detail” is a collaborative post.
Hair is one of the hardest things to photograph well because it’s constantly doing three jobs at once. It reflects light like a mirror (shine), it creates shape and shadow like a sculpture (volume), and it contains a thousand tiny strands that demand detail (texture). If your lighting is wrong, hair turns into a flat dark blob. If your background is wrong, flyaways become the main character. If your angle is wrong, volume disappears. And if your editing is too aggressive, shine looks like grease and detail looks crunchy.
The good news is hair photography isn’t a mystery. It’s a set of repeatable decisions about lighting, background, angles, and styling. Once you understand how hair behaves in light, you can create images that show healthy shine, realistic volume, and crisp detail, even on a phone.
This guide gives you practical tips for photographing hair for salons, portfolios, beauty content, product marketing, and social posts. You’ll learn how to light hair so it looks glossy without looking oily, how to make volume visible, how to capture curl definition and texture, and how to avoid the most common pitfalls that make hair look dull or messy on camera.
What Makes Hair Look Good in Photos?
When hair looks “good” in a photo, you’re usually seeing three things clearly:
- Highlight control (shine)
There are clean, intentional highlights that follow the curve of the hair. That highlight shape is what reads as “healthy shine.” - Shadow structure (volume)
Volume is visible when you can see gentle shadows that define shape around the crown, sides, and ends. - Texture detail (definition)
You can see strand detail, curl pattern, or smoothness without the image turning into a noisy mess.
If any of these are missing, hair can look flat, dull, or undefined.
The Golden Rule: Hair Needs Directional Light
Hair is reflective, which means it needs a light source with direction to create a highlight. Flat lighting from multiple angles can make hair look even, but it can also remove the highlight structure that makes hair look glossy and dimensional.
The easiest flattering light sources:
- A window with indirect light coming from one side
- Open shade outdoors (outside but not in direct sun)
- One soft artificial light source with diffusion
What to avoid:
- Overhead ceiling lights (unflattering shadows, dull shine)
- Direct flash (hotspots and harsh contrast)
- Mixed lighting (color casts that make hair tones look wrong)
Directional light creates a highlight. Diffusion makes that highlight look smooth rather than harsh. You want both.
How to Photograph Shine Without Making Hair Look Greasy
Shine is basically controlled reflection. If the highlight is smooth and follows the hair shape, it reads as healthy. If the highlight is blown out, patchy, or too intense, it can look oily.
Tips for capturing shine:
- Use soft diffused light so highlights aren’t harsh
- Position the light slightly above and to the side of the subject
- Angle the head so the highlight runs along the hair, not straight into the camera
- Use a darker or neutral background to help highlights pop
- Keep the hair surface smooth: brush lightly and control flyaways
A simple shine setup:
- Place the subject near a window with a sheer curtain
- Turn their body slightly away from the window
- Have them turn their head back toward the camera
This creates a beautiful highlight ribbon along the hair without blasting the face with light.
Pro tip:
Shine is easiest to see on curves. If hair is long, ask the subject to slightly rotate the shoulders or tilt the head so light catches the top layer.
How to Show Volume (Because Volume Is Mostly Shadow)
Volume is not just “big hair.” It’s visible shape. You show shape by showing shadow transitions. If the lighting is too flat, hair volume disappears. If it’s too harsh, shadows look messy and unflattering.
To make volume visible:
- Use side light rather than front-on light
- Keep some shadow on the far side of the hair for depth
- Avoid pressing hair flat against the head with awkward poses
- Photograph from a slightly lower angle for added lift at the crown
- Use wind or movement gently to separate layers
Posing tricks for volume:
- Have the subject turn slightly so you see both the front and back layers
- Ask them to lift the hair at the crown lightly with fingers, then release for natural lift
- For curls, have them gently shake out roots before the shot
- For long hair, have them bring hair forward over one shoulder for thickness, then do a second shot with hair behind for shape
If you’re photographing a blowout:
- A slight head tilt and a gentle turn can make the layers look fuller and more dynamic.
Backgrounds That Make Hair Look Better Instantly
Hair needs separation from the background. If hair is dark and the background is dark, the outline disappears. If hair is light and the background is bright, detail disappears.
Choose backgrounds with contrast:
- Dark hair: use lighter neutral backgrounds (light gray, beige, off-white)
- Light hair: use darker neutral backgrounds (charcoal, deep gray, muted tones)
- Red hair: avoid bright red or orange backgrounds that compete
- Color-treated hair: choose neutrals so the color reads accurately
Backgrounds that work almost always:
- Medium gray wall (great for most hair tones)
- Beige or warm neutral wall
- Simple textured wall (subtle texture, not busy)
- Clean outdoor greenery in open shade (if not too chaotic)
Avoid:
- Busy patterns (they fight with hair detail)
- Bright colored walls unless it matches the brand vibe
- Backdrops that are the same tone as the hair
Pro tip:
If you’re shooting at home, a large foam board or neutral sheet can become a quick background. You don’t need perfection, you need separation.
Angles That Show Hair Detail (Without Distortion)
Hair photography is very angle-sensitive. The wrong angle can flatten curls, hide layers, or distort head shape.
Reliable angles:
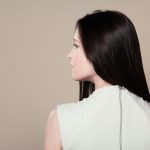
- 45-degree angle: shows both face and hair shape, ideal for most styles
- Side profile: great for shine ribbons and sleek styles
- Back view: essential for cuts, color, and long hair transformations
- Over-the-shoulder: shows length and detail with a flattering pose
For detail shots:
- Move closer rather than zooming digitally
- Keep the camera level and steady
- Tap to focus on the hair, not the face
- Use the rear camera on phones for sharper detail
A salon-style shot set that works:
- Front 45-degree
- Back view centered
- Side view to show layers
- Close-up of texture (curl pattern, braid detail, color blend)
This set tells the full story and makes hair results feel real.
Lighting Setups That Always Work for Hair
Setup 1: Window Light + Diffusion
- Subject near window with sheer curtain
- Light from the side
- Optional white board on the opposite side to soften shadows on the face
This setup gives soft shine and controlled shadows.
Setup 2: Open Shade Outdoors
- Subject in shade, facing open sky
- Avoid dappled leaf shadows
- Use a neutral wall or background behind if possible
Open shade gives even color and clean detail.
Setup 3: One Light + Bounce
- Use a single LED light aimed at a white wall or foam board
- Place subject so bounced light hits hair from the side
This creates soft, even illumination that’s easy to repeat indoors.
Pro tip:
If hair looks flat, increase directionality by moving the light more to the side. If hair looks too shiny, diffuse more or lower exposure slightly.
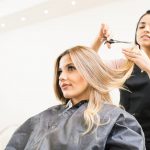
Capturing Curl Definition and Texture
Curls and waves need detail. But too much sharpening can make curls look crunchy. The key is to capture real definition with good light and focus.
Tips for curls:
- Use side light to reveal shape
- Avoid harsh overhead light that creates shadows in curl clumps
- Photograph curls when they are fully dry
- Use a background with contrast but not distraction
- Capture movement: a slight head turn or gentle hair flip can show bounce
For close-ups:
- Focus on one section and fill the frame with texture
- Keep the camera steady
- Avoid portrait mode blur on hair, it can cut out strands unnaturally
Show Color Accurately (Especially for Highlights and Balayage)
Hair color is sensitive to white balance. Warm indoor bulbs can make blondes look brassy and brunettes look red. Cool light can make warm tones look dull.
For accurate color:
- Use one light source (preferably daylight or consistent LEDs)
- Turn off mixed indoor lighting
- Avoid heavy filters
- Edit gently and keep white balance consistent across the set
If you’re documenting a color service, consistency matters. Viewers should trust the result, not wonder if a filter did the work.
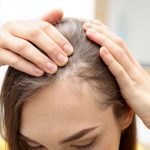
Styling Prep That Makes Photos Look Better
Photography reveals everything, including things you don’t notice in real life.
Prep checklist:
- Brush smooth top layer for shine shots
- Control flyaways with a light serum or spray
- Clean hairline and nape area
- Remove lint from clothing (it steals attention)
- Make sure hair isn’t stuck to the neck or collar awkwardly
- If showcasing shine, avoid heavy oil near roots that can read greasy
Small grooming choices matter. A single stray hair across the face can dominate a photo, because cameras love high-contrast lines.
Editing Hair Photos Without Overdoing It
Editing should support what’s already there, not invent shine.
A natural edit approach:
- Correct white balance first for accurate hair tone
- Adjust exposure to protect highlights
- Increase contrast slightly to define shape
- Use clarity or sharpening gently, especially on texture shots
- Reduce noise if needed, but don’t smear detail
Avoid:
- Heavy smoothing filters
- Over-saturation that makes hair color look fake
- Over-sharpening that creates crunchy halos on strands
If you’re building marketing content, it can be helpful to supplement your own hair images with lifestyle visuals or background scenes using professional stock photos, especially for blog headers or social posts where you want a consistent aesthetic. The key is to use stock imagery as support, while keeping your actual hair result photos original and accurately edited so viewers trust what they’re seeing.
A Simple “Hair Photo Shot List” You Can Reuse Every Time
If you want a repeatable plan, use this:
- Back view: centered, full hair length
- 45-degree: shows shape and layers
- Side view: captures shine ribbon
- Close-up texture: curls, waves, braids, or color blend
- Movement shot: gentle turn or hair flip for volume
Shoot each with the same lighting and background for consistency, especially if you’re doing before-and-afters.
The Bottom Line
To show shine, volume, and detail in hair photography, you need controlled directional light, contrast with the background, and angles that reveal shape. Shine comes from smooth highlights, volume comes from gentle shadow structure, and detail comes from sharp focus and restraint in editing. With a simple repeatable setup, even a phone can capture hair in a way that looks premium and believable.


Comments are closed.